
CHARACTER EDITOR
Download ChibiChu Mode for Android or Windows. Create characters, design custom poses and build scenes in milkachuu’s Gacha Life mod.
Beta · Android 615.3 MB · Windows 605.6 MB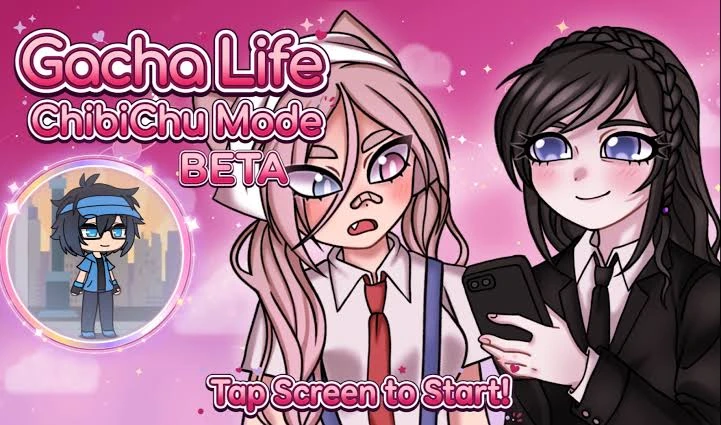
On an Android phone or tablet, choose Download Android APK. It opens milkachuu’s release post with the attachment ChibiChu-BETA.apk, listed at 615.3 MB. On a Windows computer, choose Download Windows ZIP for the 605.6 MB archive called ChibiChu-BETA-PC.zip. Both buttons take you to the individual message containing the file, so you can skip scrolling through announcements, artwork and replies to locate the release.
The easiest way to choose is to think about where you want to make your characters. If you opened this page on your phone but plan to use Studio on your laptop, send yourself the Windows release link. That saves you from transferring a large Android package to a device that needs the PC archive. On a limited mobile connection, check the listed size before you tap the attachment. Allow extra storage for the installed app or extracted files.
If someone sent you a link with the Russian words “скачать ChibiChu,” they are pointing you toward a ChibiChu download. In the creator’s posts, look for “Android” or “ПК” (PC) and check the attachment name. The APK and ZIP extensions are a quick way to tell the two editions apart even when the surrounding release notes are in another language.
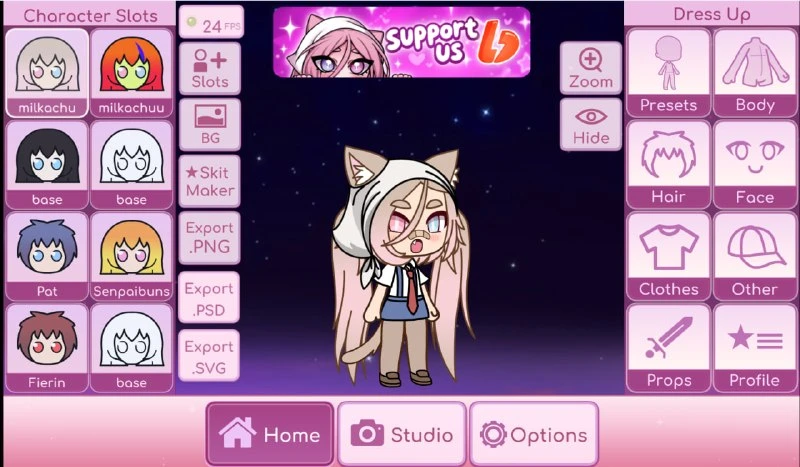
Android release postChibiChu Mode is milkachuu’s fan-made Gacha Life mod for creating characters and arranging scenes. The supplied beta screenshot gives a good indication of what you will actually spend time doing. A character stands in the middle of the screen. Saved character slots sit along the left edge. On the right, the Dress Up panel offers separate choices for body, hair, face, clothes and props. Studio sits along the bottom beside Home and Options.
People use names such as “ChibiChu Gacha Life” and “Gacha ChibiChu mod” for this project. The lettering on the pictured start screen reads “Gacha Life ChibiChu Mode,” followed by “BETA.” That wording helps when comparing screenshots from several dress-up games. Gacha Life is the base game by Lunime. The ChibiChu release buttons on this page lead to milkachuu’s modification. If a friend asks for Gacha Club, check which game they use before sharing a package or character design.
What makes the editor interesting is how much you can communicate with small changes. The same character can look as though she is waiting for a bus, listening to a friend or posing for a photograph. Her clothes can stay the same throughout. A turn of the head, a different expression and one well-placed prop can do most of the storytelling. That is a useful first experiment once the game opens.
ChibiChu project websiteIf you arrived looking for “ChibiChu APK v1.0,” use the creator’s release label to identify the Android file. The linked attachment is named ChibiChu-BETA.apk. The creator also describes this release as a beta. A version number in a page title tells you less about the file you are about to install than the name, platform and release notes in the actual post. For a later build, check the creator’s newer announcements before assuming an older attachment has been replaced.
On Android, open the release post, select the APK attachment and let the transfer finish. Opening the Telegram message alone does not download the entire file. If you choose to install it, open the completed package on the device where you intend to play and review the Android installation screen. If the phone reports that the package is incompatible, check the message against the creator’s release information before changing anything on the device.
Before trying the beta with a character you care about, keep a separate copy of any existing saves you can back up. A screenshot is also a useful visual reference. Capture the outfit, face and colours of your favourite character so that you have something to work from if a design needs rebuilding. For your first session, pick an unused slot and a simple outfit. Check that the character is still there after reopening the app before spending an evening on a full cast.
Android and Windows downloadsThe Windows release comes as a ZIP archive. Once the download finishes, extract the archive into a folder you can find again and open ChibiChu.exe from the extracted contents. Keep the application and its companion files together. If you want easier access from the desktop, create a shortcut to the application in its folder. Moving just the executable can leave it apart from the resources it expects to find.
The project lists 64-bit Windows 10 or 11 and DirectX 11 graphics support. If you are choosing between a shared family laptop and a desktop, check the Windows system information on the machine you intend to use. Then make sure there is room for both the downloaded ZIP and its extracted contents. Those are separate copies on disk while you keep the original archive.
A larger display is particularly helpful when arranging two characters in one scene. You can see whether a hand overlaps a sleeve or a dark hairstyle disappears against a dark backdrop. Try a single test scene before moving a large project into the beta. Save one character, export a picture and open it in the program where you intend to finish the artwork. That short trial will tell you more about your own workflow than a long list of features.
Windows release postStart with a small design brief. For example, make a student who has just arrived at school in the rain. Give the character one detail that will remain recognizable in every scene, such as a yellow hood. Pick a second colour for the outfit and leave most of the accessories until later. Check the silhouette at a small size. If the hood is the detail that tells the story, it should still be visible when the whole character fits in a thumbnail.
Work outward from the face. Choose the eyes and expression first, then try hair shapes that leave enough of the expression visible. In the supplied character editor image, the hair and face have their own controls. This makes it easier to change the fringe without losing track of which part of the design you are evaluating. Take a quick screenshot of two alternatives and compare them side by side before filling the costume with detail.
For a second version, keep the same face and palette and change one thing that affects the story. An open-eyed expression can show the moment the student spots a friend. A different arm position can suggest that she is about to wave. Keep both versions if you have space. When you move into Studio, you will already have a pair of related designs to try in consecutive panels, and the reader will recognize that they represent the same person.
Explore the character toolsA pose is easier to build when you know what the character is looking at. Imagine a small scene at a classroom door. One student is already inside and the other has just arrived. Place them far enough apart that their outlines are easy to read. Turn their attention toward each other, then decide who speaks first. The listening character can have a quieter pose. That gives the viewer a reason to look at the speaker.
Now test the same scene without dialogue. Could you still tell whether the newcomer feels welcome, surprised or uncomfortable? If both characters face forward with identical expressions, shift one character’s attention or change a hand position. Make one adjustment at a time and compare the result. A plain background is helpful while testing because it lets you judge a pose independently of the wallpaper, furniture or lighting you might add later.
For a short comic, save a reference image of the first panel before changing the composition. Note which side each character occupies and which direction each one faces. Keeping those details consistent makes the next frame easier to follow. A close-up can then show the important change, such as a smile under the yellow hood. You can build a readable sequence from two characters and a doorway without introducing a new outfit or setting in every frame.
The beta editor screenshot shows three export controls labelled PNG, PSD and SVG. Choose the output according to what the next person needs to do with it. If you simply want to show a finished character in a message, start with PNG. Open the exported picture at the size you intend to share. An accessory that looks intricate in the editor can blend into the outline when the image is displayed on a phone.
For a drawing you plan to edit further, try a PSD export and open it in your preferred editor. Inspect how the layers came through before building a project around them. If you work with vector artwork, do the equivalent test with SVG. Zoom in on a curved edge and check the outlines around the eyes and hair. The presence of an export button tells you which format the editor offers. A quick sample tells you whether the result suits the particular work you want to do.
A character code serves a different purpose from a finished image. The project describes code-based sharing for character designs. If a friend wants to change your character’s hairstyle, send the compatible code along with a reference image and identify the build you used. If they just want an illustration for a comic panel, send the picture. Including the filename or the character’s name in your message makes it much easier to find the right design weeks later.
The pink title screen is the quickest visual reference for the Gacha Life ChibiChu Mode beta. It shows two characters, the ChibiChu wordmark and a prompt to tap the screen. The dress-up screenshot answers a different question. It shows how much of the editor is devoted to the character preview and how the controls are grouped around it. Open that image at full size if you want to read the menu labels before choosing a platform.
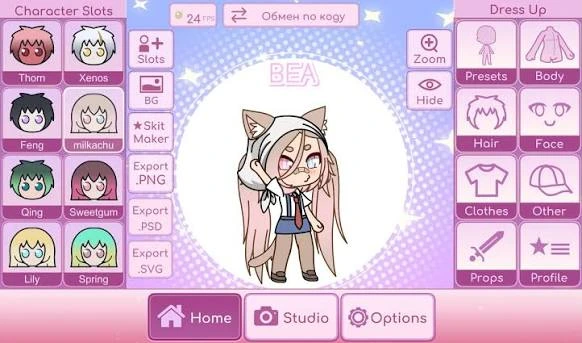
Another image shows a pale-haired character in front of a light circular background. Compare it with the character shown against the darker star field. Look at where the light hood is easiest to see and where the darker clothing stands out. If a costume looks right in the editor but disappears in a finished scene, try changing the backdrop before redesigning the outfit. Sometimes the design already works and only the surrounding colours need attention.
The gallery also includes an image labelled ChibiChu Browser Studio. The controls and the label on that screenshot identify a separate fan web creator. Use the Android and Windows release images when comparing the downloadable mod’s interface. This distinction matters if you are looking for a particular preset you saw online. A browser tool may show a feature or layout that you will not find in the same place in the beta application.
Open the screenshot galleryIf you found ChibiChu on APKPure, you may want to compare that listing with the creator’s attachment. Look at the platform and version wording before you compare the sizes. A third-party listing can use a different title or present a version number more prominently than the project does. The Android button on this page goes to the original Telegram message so you can see which file milkachuu posted and read the surrounding release announcements yourself.
If a browser shows ERR_FILE_NOT_FOUND after you open a saved download, first check what you tapped. A bookmark to a release post and a shortcut to a local file point to different places. Open your device’s downloads list and see whether the APK completed and where it was saved. If you moved or deleted it, the old shortcut can fail even though the creator’s post is still available. Locate the completed file or return to the release button for a fresh copy.
When a friend needs help with a download, ask which step failed. Could they open the Telegram message? Did the attachment finish downloading? Did an error appear only when Android opened the package? Those are three different problems. A screenshot of the exact message, the device platform and the attachment name is usually more useful than saying the game will not open. Leave personal notifications and account details out of any screenshot you share.
More download questionsIf this is your first session with ChibiChu Mode, aim for one finished result you can share. Make a character in an empty slot, choose an expression, set a simple background and export one image. Give the image a descriptive name such as “rainy-school-arrival” so you can find it again. Once you have seen how the exported result looks, return to the editor and adjust the one detail that matters most.
For a longer project, keep a small folder for each scene with the reference image, the final export and any character codes you used. That habit pays off when you return later to make a matching pose or change someone’s outfit. If you switch between Android and Windows, keep a record of which build produced each result. Start with one sample character before assuming that a whole set of designs will transfer as expected.
Choose your download